Azure Sphere

Microsoft announced the Azure Sphere product at Build in April but the hardware wasn’t publicly available until just a few days ago. For some background, check the following two links

Azure Sphere website
Background blog post explaining the concept

Strictly speaking, Azure Sphere isn’t a specific piece of hardware, but a combined hardware/software stack that extends from a microcontroller all the way to the Azure cloud. This stack is designed to guarantee security on the device and in the connection to the cloud. I specifically said from “a” microcontroller because Azure Sphere isn’t limited to the current implementation in the MediaTek MT3620. The technology will be licensed by Microsoft to other semiconductor manufacturers as well.

In its current implementation in the MT 3620 is a powerful microcontroller (really a multicore system on a chip) that contains an ARM Cortex-A7 core, two M4 cores as well as a dedicated core for securing the device and the connection to the cloud. There is built in WiFi and a fair amount of standard I/O interfaces such as I2C, SPI and a couple of UART ports. Digital IO (GPIO), Analog to digital (ADC) inputs, and pulse width modulation (PWM) ports. Not all, or even most, of these interfaces are supported in the prerelease software as of today, but clearly the future is bright.

Unlike almost everything else in Microsoft, the product doesn’t ship with a version of Windows. Instead, a Linux kernel is provided to host applications running on the device. These applications are developed using Visual Studio 2017 and the Azure Sphere SDK Preview located here.

Befitting its first name, the Azure Sphere is produced and supported from the Azure team, not the Windows side of the Microsoft house. And the set up process includes creating an Azure account, if you don’t have one, and some fairly specific steps that need to be taken to link the hardware to your Azure account. Once linked though, the programming of the device is done locally via Visual Studio through the USB cable.

The state of the device can be reflected in the cloud using a “digital twin” concept. Changing the state of a published variable in the cloud or on the device will change the state in the corresponding twin. Of course, the device application can be updated from the cloud. In addition, Azure provides extensive support for managing individual or groups of Azure Sphere devices.

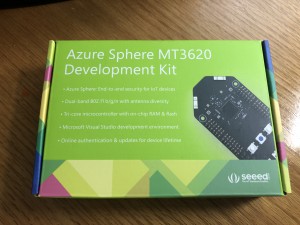
I received one of the new development kits a few days ago. Here are a few photos showing the kit:
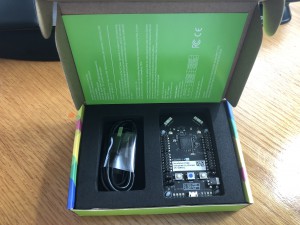

The development kit contains the MT3620 evaluation board and a standard mini USB cable.

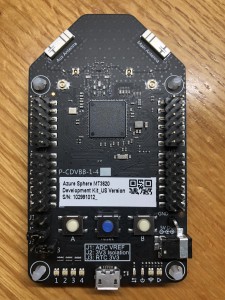
The evaluation board has two headers on each side of the board. These headers bring out the various IO ports supported by the MT3620. The board can be powered by a dedicated 5v power supply (located on the lower right in the image above) or by the mini-USB port on the bottom of the image.

The LEDs on the lower right of the board provide status such as USB activity, power and WiFi activity. The far right LED, is currently defined to be application activity but it’s currently not supported. On the lower left, there are four full color LEDs available to applications.

Across the top are the primary (right) and aux (left) antennas for the WiFi hardware. There is also support for external antennas although to use them, the board needs to be modified to move a surface mount jumper. On the underside of the board is a mount for a coin cell battery that can be used to maintain the real time clock while the device is unpowered.

If you would like to buy one of these evaluation kits, there available via Seeed here. The kit is $84.90. Note that there are separate kits for US, Europe and Japan. That $85 may seem steep but it’s an initial price and it’s for the development kit. The chips themselves are less than $8.65 according to the Microsoft Azure Sphere pricing web site here. Support is guaranteed through July 2031.

Stay tuned for more posts on Azure Sphere. I’m really interested in this device.

Posted in Azure Sphere, Featured | Comments Off

What happened to the Raspberry Pi project?

So, what happened to the Raspberry Pi project? Well, I did publish a BSP. However, I never did get the USB driver working properly. It was on GitHub for a while but without activity, it’s been purged. If you want the source, let me know.

Then Windows Embedded Compact 2013 dropped support for the Pi 2’s ARM core, so the project was stuck on WEC 7. Finally, Microsoft has moved away from the entire Windows CE/Windows Embedded Compact OS, so I really didn’t see a reason to update the BSP. I still love Windows CE and still support a variety of Windows CE and Windows Embedded Compact projects but unless someone really needed the port, I’m not going back to the Pi.

Posted in Uncategorized | Tagged | Comments Off

Pi BSP Project Development Concepts

I’m not a Linux guy, so the first thing I thought when I saw news articles on the device was if I could get Windows Compact 7 (Windows CE) running on the device.  It seemed to be a challenge right down my alley.  The code needed to port the OS is called a Board Support Package (BSP), and I’ve written a number of BSPs over the years going back to my first work with Windows CE 1.0 back in the mid 1990’s.

My BSP is going to be released as “Shared Source” so that anyone can use the BSP to run Windows Compact 7 on the device.  Shared Source is Microsoft’s version of a source code license that allows the user to do just about anything they want including putting the code in a shipping product.  It’s not ‘viral’ like GPL where the any code derived from GPL code must also be GPL.

Given the nature of GPL and the rather zealous nature of some of its proponents, I wanted to avoid any accusation that I was taking GPL code and putting it into my BSP.  To minimize that possibility, I’ve avoided looking at any source code for the Raspberry Pi’s Linux distros.  I have been reading various web sites, but I haven’t downloaded any source.  I did download a binary of a boot disk so that I could test the hardware and ensure that it works.

This clean room approach is problematic given that the full programming manual for the Broadcom BCM2835 (the CPU on the Pi) is not public.  Broadcom has provided a peripheral manual that discusses the register addresses / functions of some of the embedded peripherals but it’s not complete.  Still, throughout the project I plan to stick to my guns about not looking at the Linux port.

More soon…

Posted in Raspberry Pi, Windows CE, Windows Compact | 9 Comments

I have a new Raspberry Pi!

The Raspberry Pi is a revolutionary computer.  Not because it’s fast, although it does okay.  It’s because the Raspberry Pi costs only $35.  For that you get an ARM based Broadcomm CPU, 256 Meg of RAM, 2 USB ports, an Ethernet port, an SD Card socket, sound and HDMI out video.  A lower cost version ($25) removes the Ethernet port and 1 of the USB ports. Pretty cool.  You can find out about the Pi at www.raspberrypi.org.

They’ve been pretty hard to get one of these devices but with the help of a kind soul across the pond, I’ve managed to get hold of one.  While the Pi organization is has various versions of Linux running on the device, I’m going to develop a Windows Embedded Compact (Windows CE) Board Support Package so that I can run WEC on the device. It should be an interesting project that I’m going to document my work here in the blog.  We’ll see how it goes…

Posted in Raspberry Pi, Windows CE, Windows Compact | 7 Comments

Silverlight for Windows Embedded

The Embedded world has both seen significant change and not so much change since Microsoft introduced Windows CE 1.0 back in 1996. Back then, when Microsoft introduced a fully featured GUI based operating system, one of the touted features was that knowledge of the desktop Windows OS would transfer down to Windows CE. Both have a Win32 based API, Both use the same file formats for .EXE and DLLS, both had a GDI/User based user interface with an Explorer-style shell.

In 2011, those similarities remain features of Windows Embedded Compact 7, the latest version of Windows CE. The Win32 API, file formats, and GDI/User UI remain. However, the desktop has moved, along with the other players in the industry to a more “Internetty” style user interface where the user interface is defined in a markup language and the intelligence of the application is written in code typically referred to as “code behind” Apps following this paradigm include browser-based UIs using HTML and JavaScript, along with Flash-based apps. Microsoft has pushed Silverlight, its rich-UI, cross platform, browser based solution as its entry into this programming style. Silverlight combines a power UI description language XAML, with CPU independent managed (.NET) code as the code behind. Silverlight runs across lots of browsers and even on Mac OS X systems.

Microsoft’s Embedded team has adapted Silverlight technology for use on Windows Embedded Compact, taking the powerful XAML driven rendering engine but replacing the (somewhat problematic) managed code back end with native C++ code. Running native code dramatically decreases startup time, enables direct access to the Win32 API and drivers and avoids that annoying garbage collection pause that eliminates managed code from driving real time applications. “Silverlight for Windows Embedded”, or SWE as it’s sometimes known, is a huge differentiator for Windows Compact, providing a powerful user interface engine that simply is head and shoulders above the competition.

So, how does one write an SWE application? First, download an evaluation copy of Windows Embedded Compact 7 here. If you’re not in Korea where lightning fast broadband is the norm, expect this to take a while as the download is massive. You can also contact your local Windows Embedded Rep. to get the multi-DVD package. If you are currently developing with Windows Embedded CE 6, you’ll want to install Compact 7 on a separate machine or in a VM as CE 6 and Compact 7 can’t be installed side-by-side.

With the evaluation copy of Windows Embedded Compact 7, you’ll also get an eval copy of Expression Blend 3, which is the tool used to assist in designing the SWE application’s front end. SWE uses Blend 3 because the Silverlight rendering engine used in SWE is Silverlight 3 based.

There is a great blog post on the SWE Blog that describes your first SWE application. There are other posts on how to create a Compact 7 image that supports SWE as well as one that describes how to create a control with SWE. Unfortunately, there isn’t much activity in the blog with the last post being August of 2010. However, the content that is there is quite is informative.

There was an earlier version of SWE that shipped with Windows CE 6 Release 3. However, this version supports only Silverlight 2, is slower than the Silverlight 3 version in Compact 7 and doesn’t have the powerful translation tool that auto generates the C++ native code framework from the Blend project. Some folks that used the CE 6 R3 version came away with a bad impression. The new version in Compact 7 is much better. I hope those early adapters will give the new version a try. It’s a whole new ballgame.

Posted in Windows CE, Windows Compact | Comments Off

Hey! I've Updated my Site

You may notice a bit of a change.  I’ve updated my site and blog.  I hope to bring new and interesting content to the blog.  Let me know what you think.

Posted in Featured | Comments Off

Windows Embedded Compact 7 Announced

Microsoft has (finally) announced Windows Embedded Compact 7.  The release would more appropriately be called Windows CE 7 but the marketing people decided they knew better.  This is a significant update to Windows CE (oops, Compact, or Embedded Compact, or Windows Embedded Compact, or WEC) with an updated kernel, network stack, better integration with Win 7 device technologies and lots more.

The big news from a technical perspective is OS support for multicore processors (I’ve run it on a 4 core ARM CPU and it rocks!) and support for up to 3 GB of physical RAM.  The new kernel also supports ARM 7 (but as a tradeoff, ARM 4 support is dropped).

The network stack has been upgraded to a more modern version of Winsock.  A component has been added to allow WEC-based devices to integrate seamlessly into Windows Device Stage.  They’ve also added back the Office Viewer applications that were removed in CE 6.

Silverlight For Embedded, first released in CE 6 Release 3, has been updated to support Silverlight 3 constructs and is accompanied by a powerful development tool that eases the integration work to hook in the C++ code behind. Multitouch and gesture support has also been added.

There’s lots more to this significant release.  Check out www.microsoft.com/windowsembedded/en-us/products/windowsce/compact7.mspx for details.

Posted in Uncategorized | Comments Off

Windows Phone and Multitasking

There is a huge amount of interest in the new Windows Phone platform.  This new platform is new and cool and provides a great platform for applications.  The new Windows Phone programming model uses a custom built Silverlight runtime to execute 3rd party applications.  Native code access to the system is limited to Microsoft and OEM / Cell Carriers that have access to the proper certificates.

While managed application development is quite limiting to those of us who have had the freedom of the system for over 10 years of Mobile devices, it’s clearly easier to develop a good looking Silverlight application than it is to write the same application using the basic Win32 API.

So, unless you work for a device manufacturer or cellular carrier, you’re left with writing Silverlight apps that not only can’t access the system and, according to Microsoft, can’t even run in the background.  To quote SNL’s Seth Myers; “Really!?!”  Fortunately, applications aren’t quite that limited.

First, a caveat.  This post is based on some investigations of the current emulator image provided in the April refresh of the Windows Phone tools.  There may be changes by the time the OS reaches “real” hardware or simply due to changes due to tuning as the OS comes close to release.  Now, with the lawyers satisfied, let’s look at what is “really” going on.

Basic Application Start up and Termination

Let’s do some basic stuff first.  The user can switch from a running Windows Phone application essentially two ways.  First, the user could hit the Back button while the application is running.  If this occurs, the OS closes the application. If the user later starts the application, a new instance of the application is launched.  It’s the responsibility of the application developer to restore any state to the application to reproduce where the application was when the user hit the back button.

Applications can be notified of startup and shut down by adding the appropriately named Application_Startup and Application_Exit events fired by the System.Windows.Application class.  You can add handlers for these events two places.  The first way is to add the event by adding attributes to the Application class element in App.xaml.

The other way to hook these events is to do it programmatically in the Application class constructor.  This is the way the default Windows Phone template code hooks the third Application class event, UnhandledException.

When the application is started, the class constructor is first called then the Application_Startup event handler is called.  When the application terminates, the Application_Exit event handler is called.

Suspending and Resuming an Application

If the application is running and the user hits the Windows or Search buttons, the application is not (normally) terminated.  Instead the OS places the app in a “suspended” state in memory.  If the user later returns to the application either by restarting it or simply hitting the back button to dismiss the newer screens, the application resumes.

In these cases, the Application_Exit event isn’t fired since the application never terminated and since it was never restarted the Application_Startup event isn’t fired on resume.  However, there are two events that are: WindowsPhoneEvents.Pause and WindowsPhoneEvents.Resume.  These events are in the Microsoft.Phone.Execution namespace.  They can be hooked in either the Application class constructor in App.xaml.cs or the MainPage constructor in MainPage.xaml.cs. These events fire as expected, when the application goes into the background and then when it returns to the foreground.

If the application terminates, the Pause event fires before the Application_Exit event, so you can use the Pause event has an indication of both suspending and exiting.  In general, this is also true if the application is running in the background.  The Pause event will fire on going to the background and then when the application is terminated, the Application_Exit typically event fires.  I say typically because I’ve seen places where the Application_Exit event doesn’t fire if the application is in the background. This may be a bug in the current implementation, but it is something you should know.

Background operation

The Windows Phone team made waves when the platform was introduced by indicating that, at least initially, Window Phone would not multitask 3rd party applications.  The answer sounded pretty absolute.  The actual implementation isn’t.

This isn’t the place for a treatise on multithreaded managed applications. But briefly, very briefly, Windows Phone applications can be multithreaded.  The main thread of the application calls the appropriate methods to create the main application form and is the “user interface thread”.  Other threads created by the application can’t directly interact with the user interface.  These threads are called “worker threads” or “background threads”.

When an application is sent to the background, the foreground thread is suspended.  However, any worker threads currently running in the suspended application continue to run.  These worker threads can call base class library methods such as querying the file system, reading and writing files, and such even while the application is “suspended”.

When a worker thread tries to invoke a method on the foreground thread, that request is queued but not executed.  When the application is resumed, the queued calls are invoked.

Of course, “suspended” applications live on borrowed time.  If the system needs the memory used by the application it will be terminated.  At that point, the Application_Exit event should (but sometimes doesn’t) fire.

A Feature and a Consequence

So, while true multitasking doesn’t exist on the Windows Phone, applications can ‘borrow’ some background processing time as long as the system is lightly loaded. This sounds great and can be used to the advantage of the application.  However, developers should understand this “feature” and if their applications have worker threads that don’t need to run while the application is suspended, they need to ensure that those “worker” threads block while the application is suspended.

It should go without saying that all threads should block (almost) all the time.  Threads that poll or simply run too long will quickly drain the battery of any mobile device.  A poorly written worker thread combined with the system’s ability to run these worker threads while suspended could easily ruin the battery life on a phone.

The new Windows Phone platform has attracted interest from a vast array of .NET developers who are quite familiar with desktop and server development.  However, phones, PDAs, and other battery powered devices are very different animals.

Remember, you’re developing on a phone, not a desktop, things are different down here!

Posted in Uncategorized | Comments Off

Let’s try this again…

Okay, I’m not the best blogger in the world.  Actually, I’ve been a horrible blogger.  Aside from the trip blog I did last year, my last post was 2 years ago…  Still, I’m going to try, try again.

Windows Phone has finally gone public.  As it is a direct descendent of the Windows Mobile series (despite the marketing effort to separate the two) it’s right down my alley.  I’m going to blog about the platform and some of my other interests.  We’ll see how this restart goes…

One other thing… I’m battling spam comments so until I can get this worked out I’ve disabled comments on the blog.  If you have a comment, send me an email.

Doug

Posted in Uncategorized | Comments Off

ThinkPads and AHCI Hard Disks

I have a Thinkpad T60p and I wanted to upgrade to one of these new 7200 RPM 320G disks.  I purchased a Seagate Momentus drive and, as I’ve done with other disk upgrades, just plugged the drive into the laptop and launched my system restore DVD.

While the drive could be seen by the BIOS, the restore app couldn’t see it.  I tried a number of things, including hard wiring the disk to SATA 150, which the PC expects.  Unfortunately, nothing worked.

I eventually ran across a BIOS setting that set the hard drive controller into “compatibility mode”  I resisted this approach for a while as  typically compatibility == slow, but after looking into it I learned that compatibility mode simply meant that the controller disabled the AHCI mode in the drive.

What surprised me was that with a little research (Google is great if you know what you’re looking for) I found out that the install code for Windows XP (and my restore disks) didn’t understand ACHI disks.  So how did I get around this problem when I restored my system last year?

The answer was that the Hitachi disks that I’ve previously been faithful to (Hitachi purchased IBM’s DeskStar/TravelStar drive biz a few years ago) disabled ACHI mode by default so the BIOS setting didn’t matter for those drives. Now that I had a Seagate drive, I needed to make the mod in the BIOS.

Once I made the change things worked just fine.  I can re-enable the mode if necessary with an XP driver update but AHCI isn’t apparently necessary on a single user laptop, so I may keep things the way they are.

Live and learn.

Doug

Posted in Uncategorized | Comments Off